Microsoft Entra ID (formerly Azure AD)
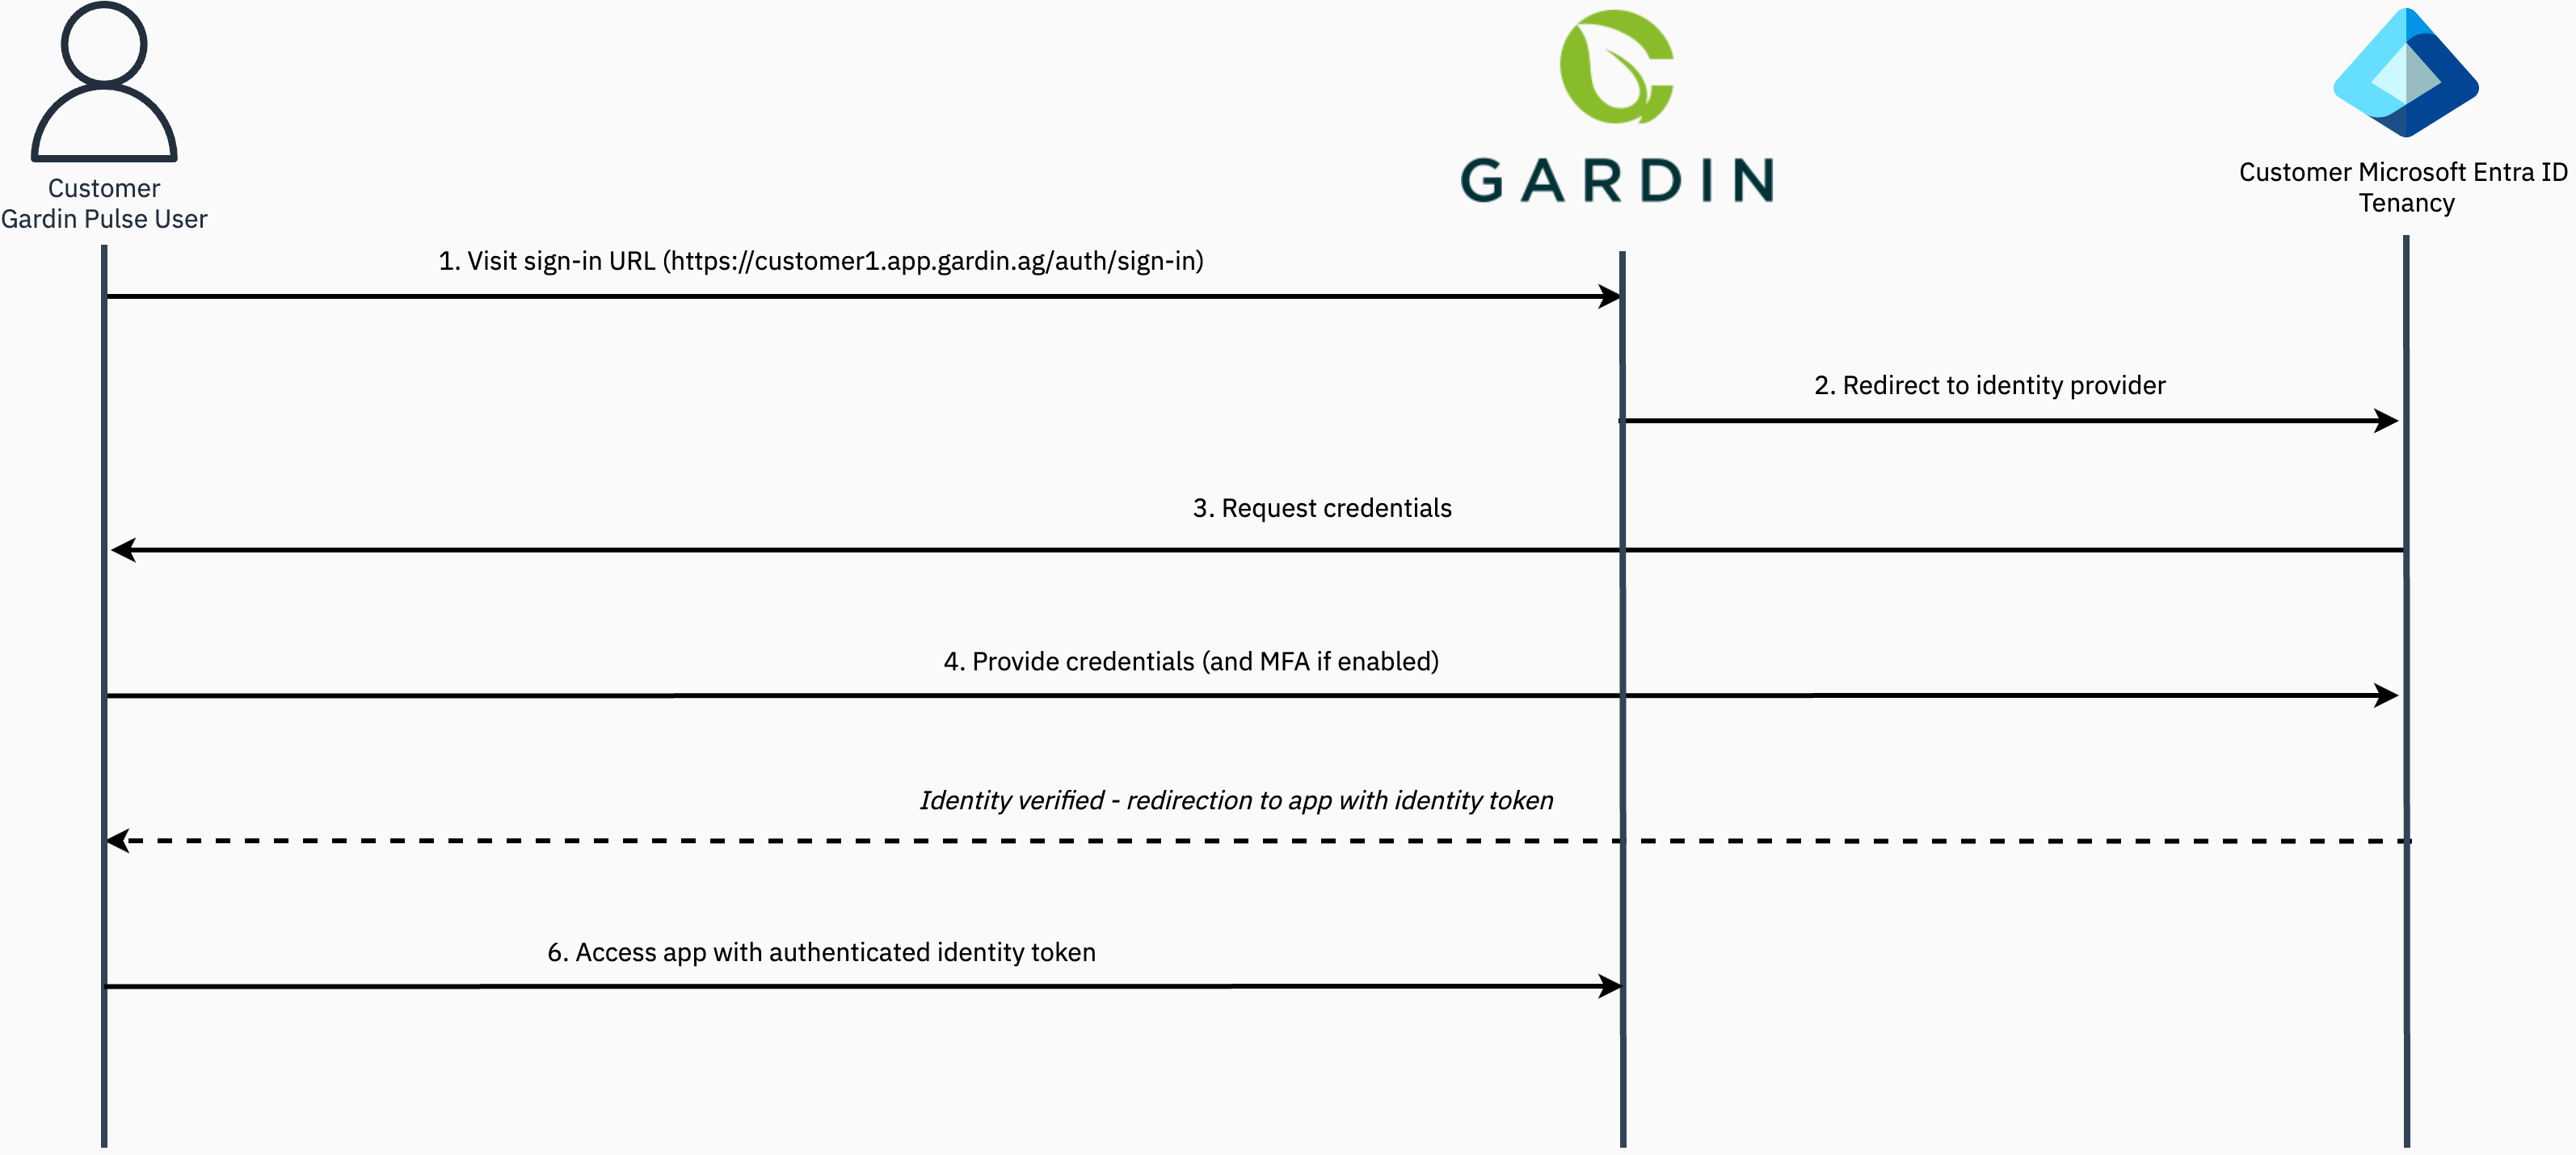
The Gardin Platform supports using Microsoft Entra ID (formerly Azure AD) as an external identity provider through SAML integration, allowing enterprise customers to authenticate and access the platform using their existing Microsoft identities.
This guide will walk you through the process of setting up Microsoft Entra ID as a SAML identity provider, configuring the necessary permissions and authentication flows, and integrating it with your Gardin Platform tenancy to enable streamlined access for your users:
Setup
Provisioning Microsoft Entra ID as an external identity provider is a multi-step process that requires input from your Microsoft Entra ID administrator and the Gardin Platform team:
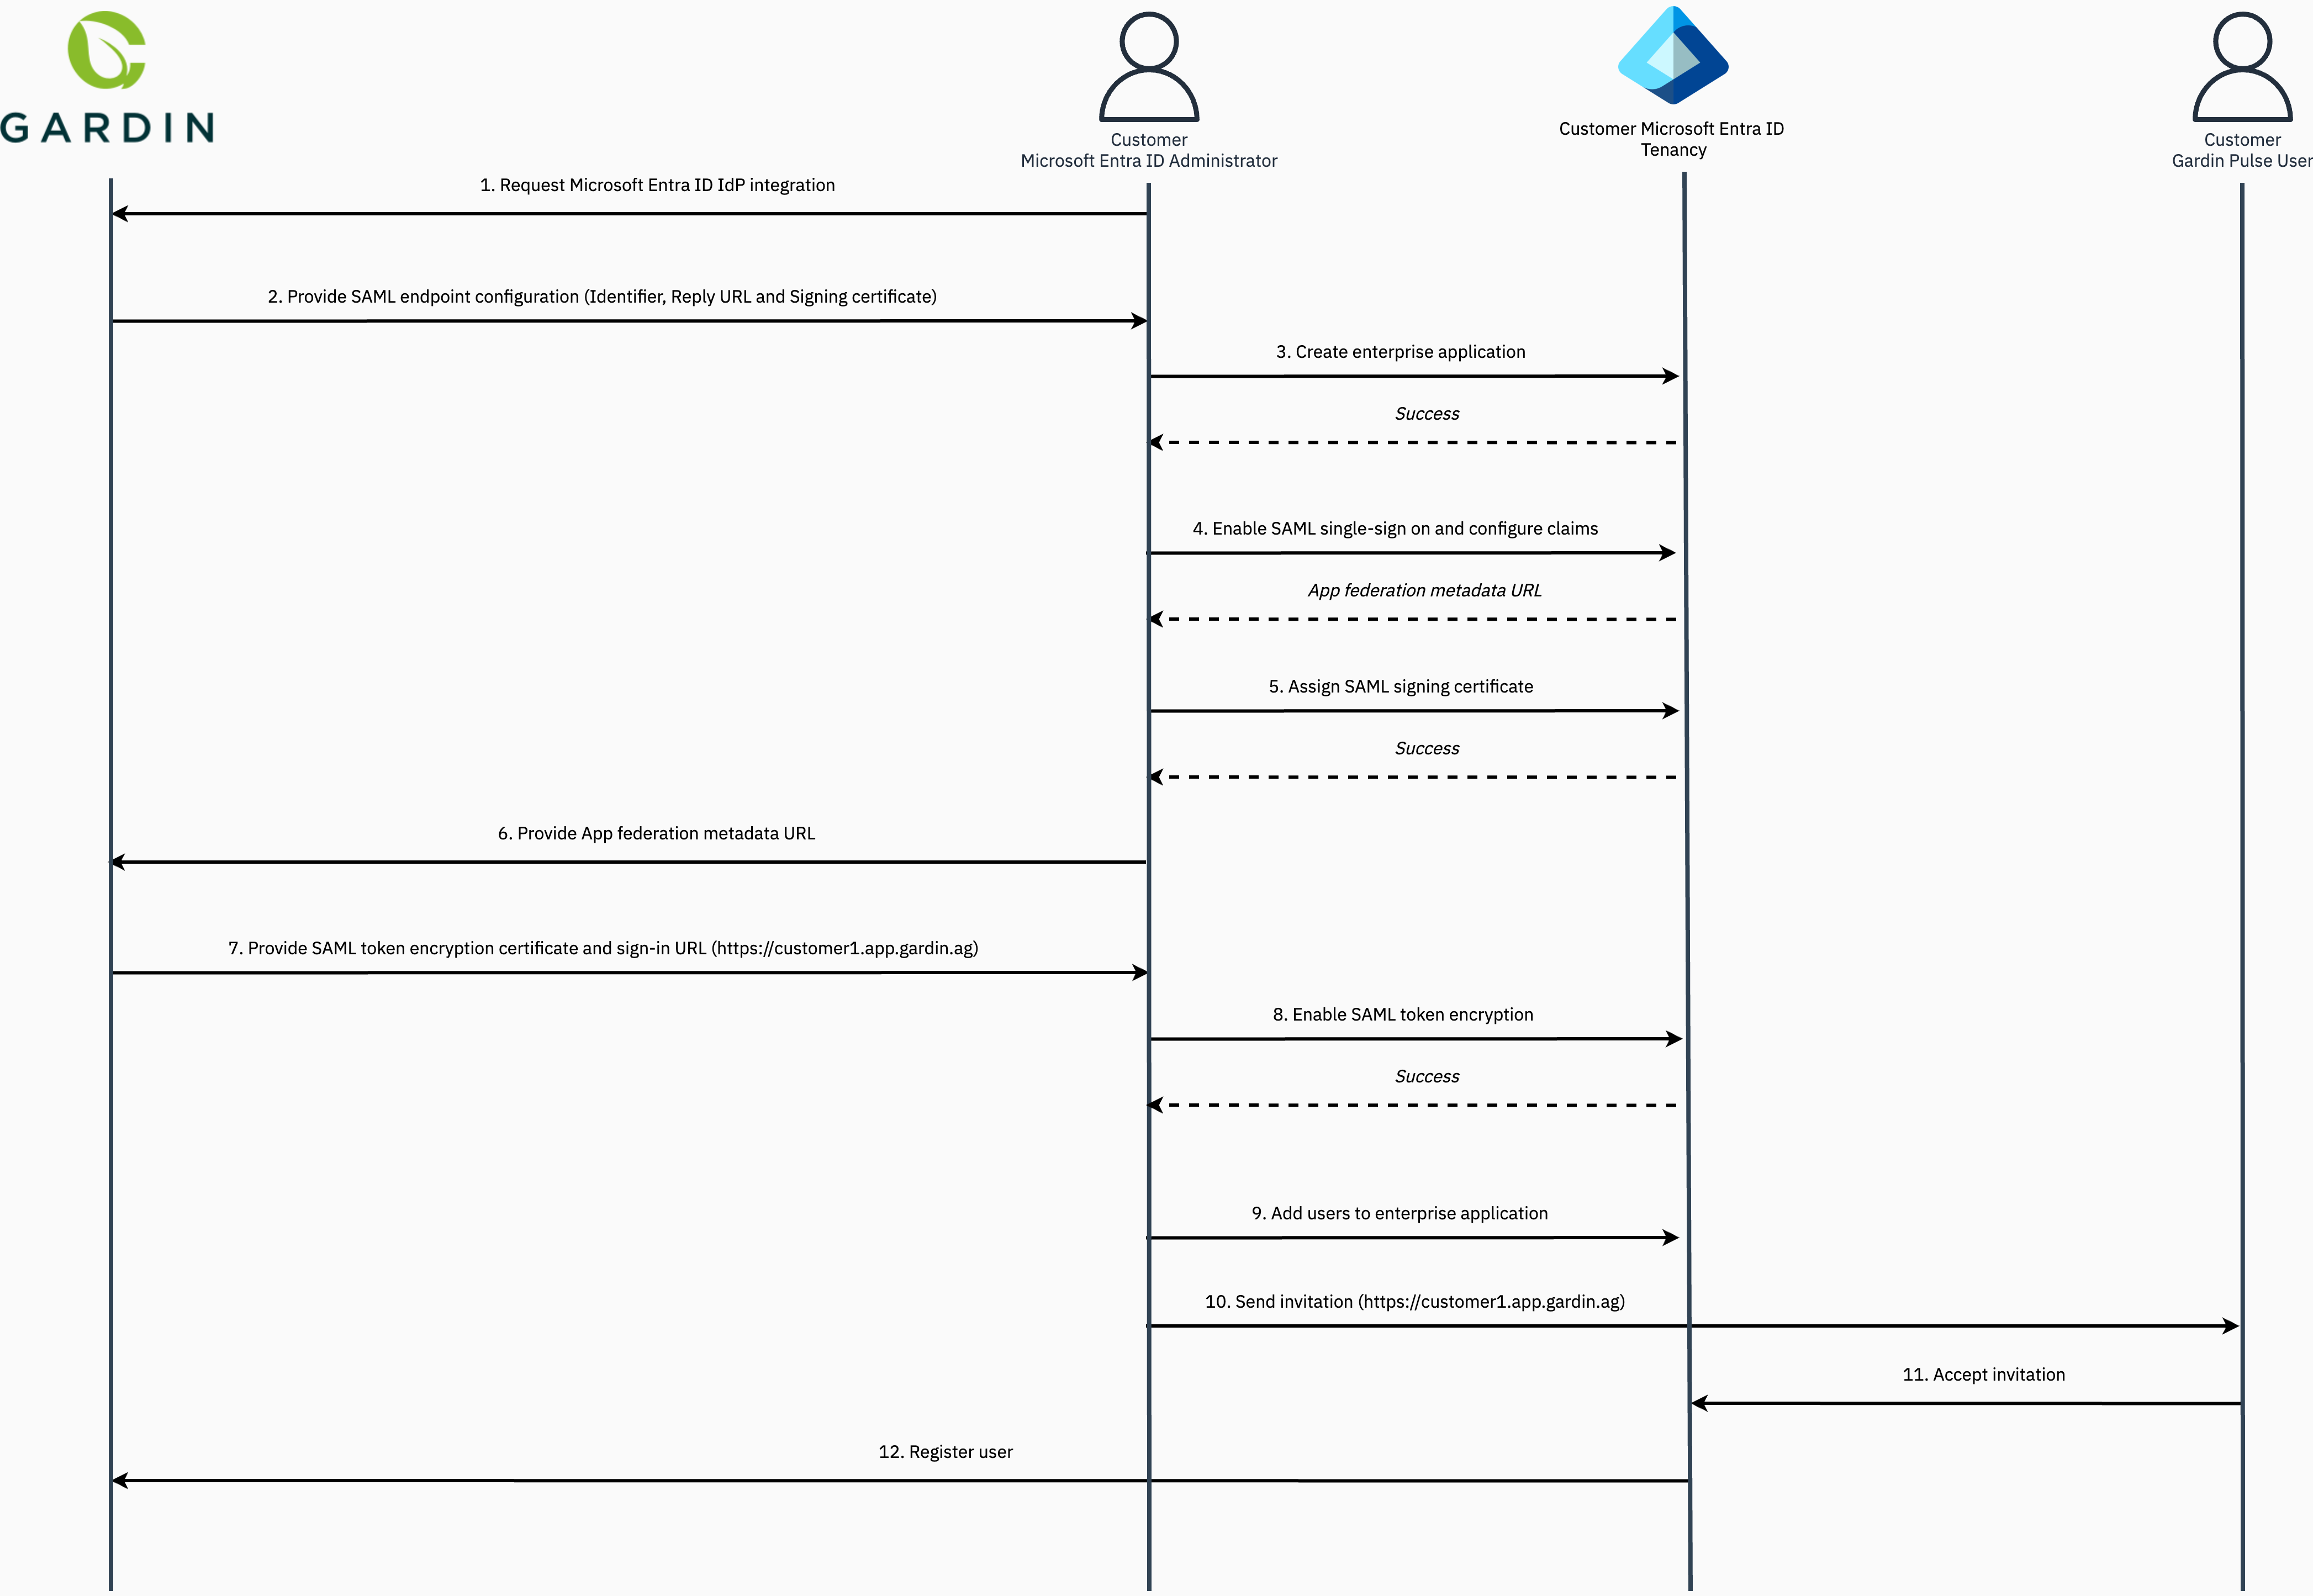
Step 1. Request provisioning of an external identity provider
Setup of an external identity provider requires customers to provide information about their Microsoft Entra ID tenancy, which must be submitted via this form.
Once received, the Gardin Platform team will undertake the necessary configuration to prepare for the external IdP to be used instead of the native identity management and authentication provided as standard.
Step 2. Receive SAML integration details
The Gardin Platform team will securely reply with the following information, which should be noted down as these are required in subsequent steps:
- Identifier (Entity ID): Unique ID that identifies the Gardin Platform application to Microsoft Entra ID.
- Reply URL (Assertion Consumer Service (ACS) URL): Endpoint where Microsoft Entra ID will send the SAML assertion to the Gardin Authentication Service during the process of user authentication.
- SAML request signing certificate: X.509 certificate that contains a unique public key that the Gardin Platform authentication service uses to sign all SAML requests, which is then verified by the Microsoft Entra ID during SAML negotiation. Whilst not mandatory, Gardin strongly recommends that explicit verification of SAML signatures be enabled for your Entra ID enterprise application to provide an extra layer of security.
- SAML token encryption certificate: Unique X.509 public certificate that the Gardin Authentication Service and Microsoft Entra ID will use to encrypt all SAML assertions in communication with one another. The Gardin Platform enforces the use of token encryption of as an enhanced security measure, providing assurance that the content of the token cannot be intercepted, and personal or corporate data compromised.**
Step 3. Create a new enterprise application in Microsoft Entra ID (formerly Azure AD)
Once you have received the Identifier (Entity ID) and Reply URL from Gardin, you can proceed with setting up the integration within Microsoft Entra ID:
- Log in to the Azure Portal.
- In the Azure Services section, choose Azure Active Directory.
- In the left sidebar, choose Enterprise applications.
- Choose New application.
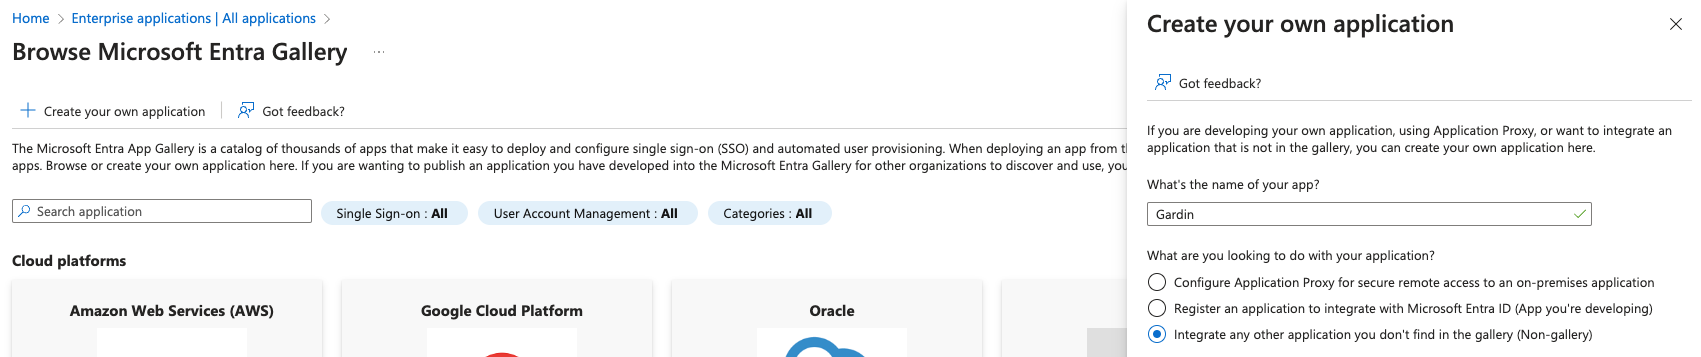
- On the Browse Azure AD Gallery page, choose Create your own application.
- Under What’s the name of your app?, enter a name for your application (e.g. "Gardin") and select Integrate any other application you don’t find in the gallery (Non-gallery), as shown below. Choose Create.
It will take few seconds for the application to be created, then you should be redirected to the Overview page for the newly added application.
Occasionally, this step can result in a Not Found error, even though the new application has in fact been created successfully. If that happens, navigate back to Enterprise applications and search for your application by name.
Step 4. Configure Single Sign-on using SAML
- On the Getting started page, in the Set up single sign on tile, choose Get started, as shown below.

- On the next screen, select SAML.
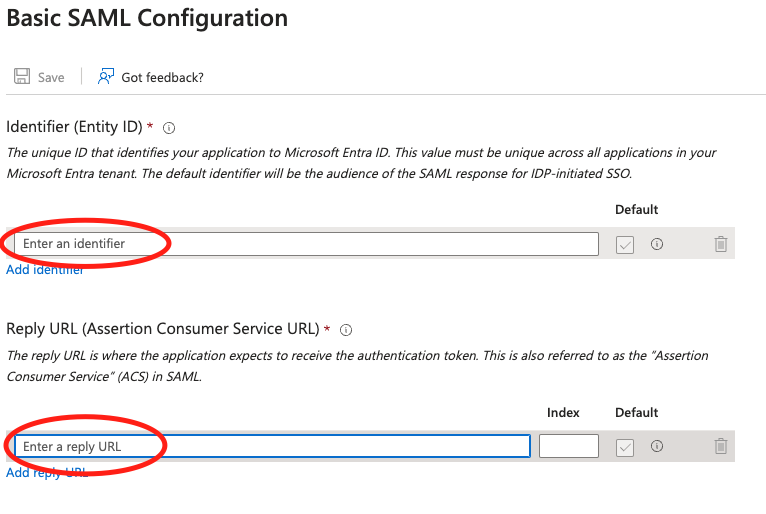
- In the middle pane under Set up Single Sign-On with SAML, in the Basic SAML Configuration section, choose the "edit (pencil)" icon.
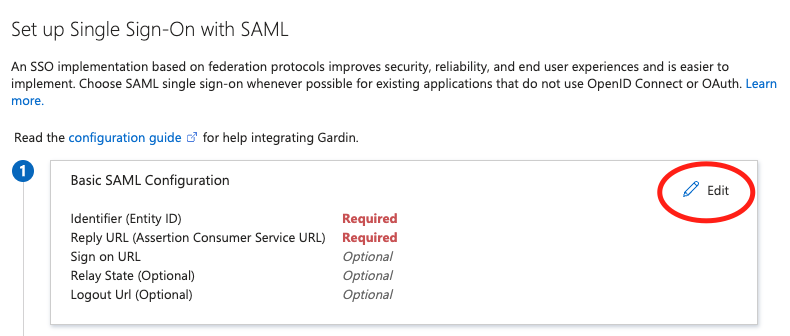
- In the right pane under Basic SAML Configuration, replace the default Identifier ID (Entity ID) with the Identifier (Entity ID) you copied previously. In the Reply URL (Assertion Consumer Service URL) field, enter the Reply URL you copied previously. Choose Save.
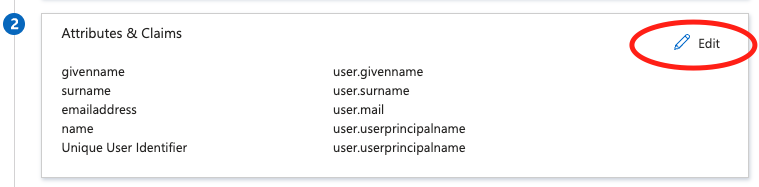
- In the middle pane under Set up Single Sign-On with SAML, in the User Attributes & Claims section, choose Edit.
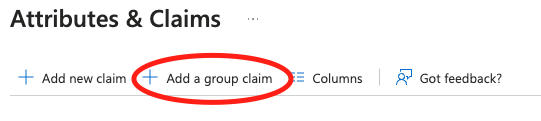
- Choose Add a group claim.
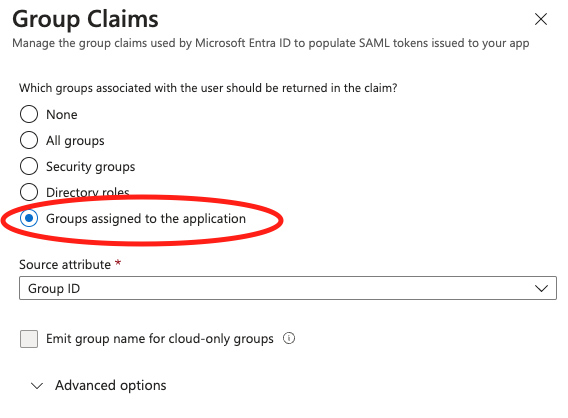
- On the User Attributes & Claims page, in the right pane under Group Claims, select Groups assigned to the application, leave Source attribute as Group ID. Choose Save.
Gardin recommends using a dedicated Entra security group to manage users who have access to the Gardin Platform. Follow these instructions to setup a new security group and assign users. You can then add this group to the enterprise application created in Step 1 using these instructions.
Note: You must use a security group and not a Microsoft 365 group.
- All other claims should be left as the default. The following claims are mandatory:
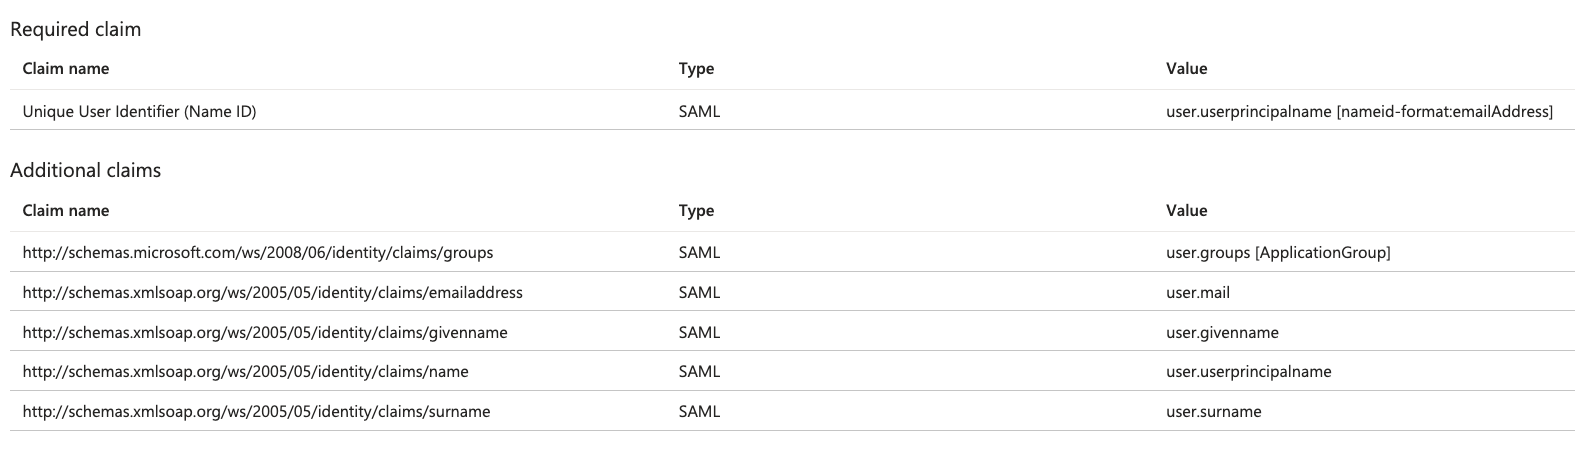
Close the User Attributes & Claims screen by choosing the "X" in the top right corner. You’ll be redirected to the Set up Single Sign-on with SAML page.
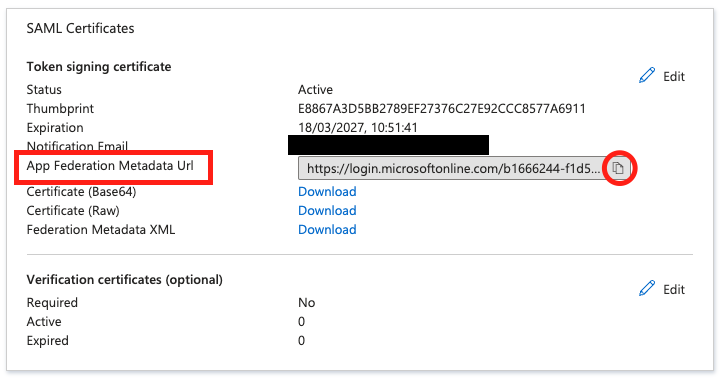
Scroll down to the SAML Signing Certificate section, and copy the App Federation Metadata Url by choosing the "copy into clipboard" icon (highlighted in figure below), save this for later.
Step 5. Enable SAML signature verification
Whilst not strictly mandatory, Gardin strongly recommends that verification of SAML signatures be enabled for your Entra ID enterprise application to prove the integrity of SAML requests as coming from a legitimate source (Gardin Authentication Service).
Within the SAML Signing Certificate section, select the Edit button in the Verification certificates panel.
Enable the Require verification certificates checkbox.
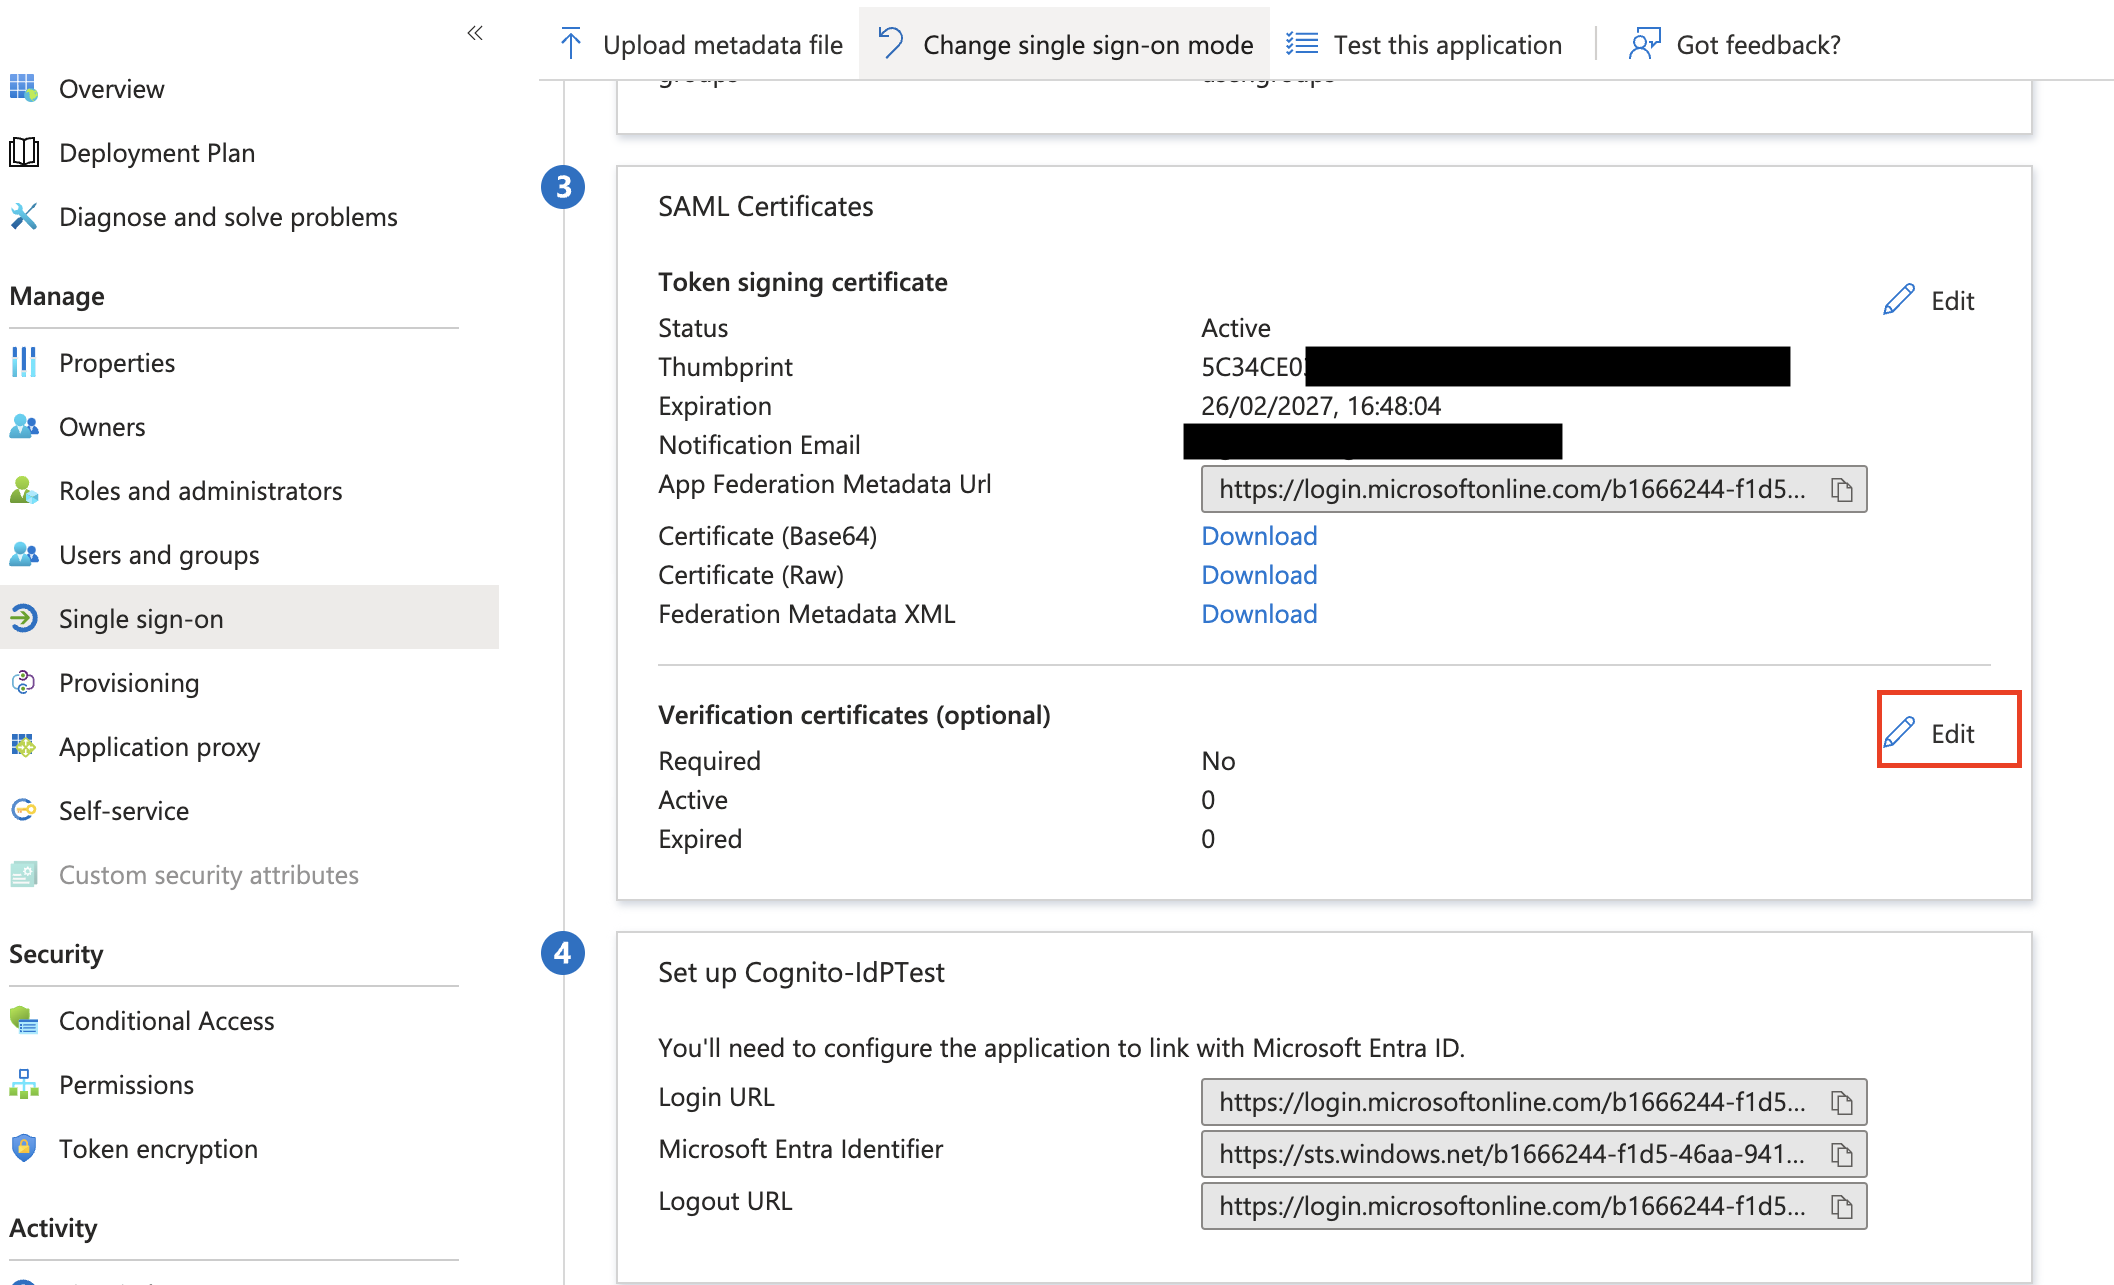
- Select Upload certificate and then choose the SAML request signing certificate that you received in Step 2. Once uploaded, click Save to exit the panel.

Step 6. Send Metadata URL to Gardin
Send the App Federation Metadata Url that you noted down in Step 4 to the Gardin Platform team via this form to allow the setup process to be finalised.
Step 7. Receive SAML token encryption certificate and sign-in URL
Upon receipt of the App Federation Metadata Url, the Gardin Platform team will complete the neccessary configuration of the new IdP in the Gardin Authentication Service before securely providing the unique token encryption certificate required in the next step, and sign-in URL to be shared with your users.
Step 8. Enable SAML token encryption
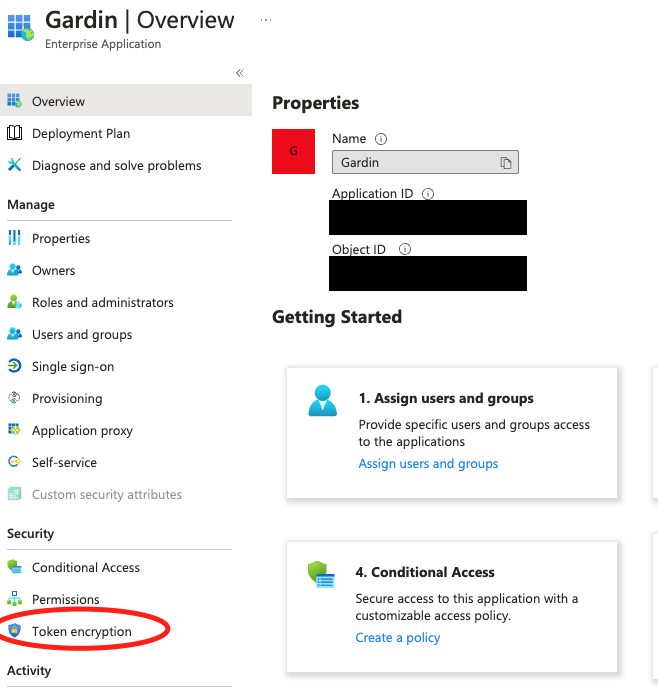
- On the Getting started page for the enterprise application, choose Token encryption from the navbar.
- Select Import Certificate and upload the token encryption certificate (
.cer) as provided by the Gardin Platform team in Step 1.
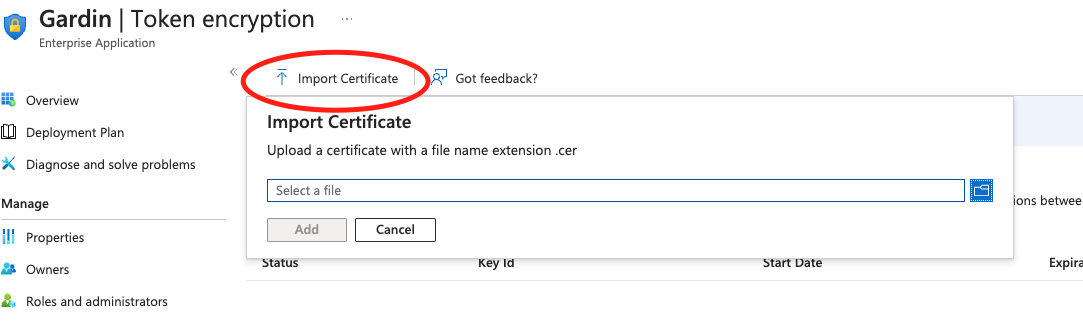
- Confirm that the certificate has been successfully imported, and is Active.

Step 9. Add users and distribute login URL
Upon finalisation of the Microsoft Entra ID integration, the Gardin Platform team will provide the URL that your users will need to visit in order to authenticate using their Microsoft Entra ID credentials and access the Gardin Platform app.
This URL will take the form: https://<UNIQUE_NAME>.app.gardin.ag, where <UNIQUE_NAME> will be specific to your Gardin Platform tenancy. Users can bookmark this URL for their convenience.
For each user from your Microsoft Entra ID directory that you wish to grant access to the Gardin Platform app, you need to do the following:
- Add users to the enterprise app created in Step 2 (or dedicated security group if you configured this) via tha Microsoft Entra ID portal.
- Invite the user via the Gardin Platform Management Console (administrator access required). If you do not have access, reach out to your Gardin account manager for further assistance.
Troubleshooting
For help with questions or issues, please contact the Gardin Platform team via integrationsupport@gardin.ag, or reach out to your Gardin account manager.